Thursday, December 30, 2010

Simple hamper transformation!


My favorite thrift store finds is the ones that require almost no work.  I found this cute hamper at the thrift store for only $4!  The outside is beautiful, but the inside fabric lining was very dirty and a bit moldy.  It had these cute little patina brass handles.


So I ripped out the fabric, left the handles on and turned it over!   Walla... instant plant stand!  This was so easy, I love it when a plan accidentally falls together.

Wednesday, December 29, 2010

Candles... Thrift Store style!

I like candles... they are great for ambiance, nice smell, and... well light.   So when I go to the thrift store, I find it odd that they have so many unburned holiday candles there.  But then I realize its a little creepy to watch Santa slowly burn over the holidays and it might freak out the kiddys.  So that is when I realized that there can be a way to reuse these guys.  Now there are many sites on the web that talk about candle safety and such so read up about that, there is no sense in burning yourself un-necessarily.  Also I am not a candle expert, just a experiment-or (an art scientist of sorts).

My supply list is such:
old candle jar
      that has been burned empty, from home
old holiday candles, $.20 each
pan to boil water, from home
newspaper, from home
skewers, from home
New wick a bit longer than your jar, $2
a metal bowl (that you will never use for food),
       thrift store $.50
long (12in) clamps or tweezers, from home

These candles were very cheap now that christmas is over.  I paid less than a quarter each for them!

 
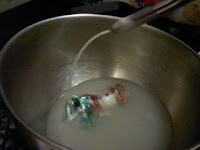
Begin by filling your pot with water, and put it on the stove on high.  immediately put your metal bowl on top and don't touch it ever again (its gets HOT quickly).  Place your candle in and wait patiently while it melts... this could take a while.


Now is a good time to talk safety... there is a good website about candle making safety here.  The most important thing is that this is hot and messy.  Prepare your surface with newspaper, to protect it.  Don't do this when you are in a rush, this is a nice slow project.   Nor is this the time to start a good movie, or get distracted by something else, and forget.  Hot wax is dangerous, and even a fire hazard.


Poor Frosty... looks like winter is  coming to an end sooner than expected.

Now use the tongs to fish out the wick, and lay it on the newspaper.  be careful not to touch the bowl or wax. 


As it melts you will notice that some candles are colored with pigments and others are covered in foil... as in this little guy. So after the wic kis rescued pull out the pieces of foil.  I used 2 candles for this project because I have a large candle glass to fill.


Once the wax is completely melted you have the option of throwing in some crayons to add color if it turns out that the candle underneath is white.  But don't mix to many colors up, it will turn mucky brown color. 
My kiddo chose pale purple crayon.  it was just one crayon that we dropped in.


Now here is where my plan started to get crazy...  In theory it would be best to just get a new wick, and use this wick for a smaller candle project, because ideally you want to wrap wick around the skewer and center it in the candle.  So at this point... use the new wick instead of trying to prop this wick while it drys.


Be careful when you pour the hot wax, use all the protective gear and such, ensure you are well versed in the safety issues here, and again go slowly.   Wax cools and hardens even slower than it melts, so you have time. 

I used my extra long clamps to hold the wick, but wrapping a skewer is just as easy.  Then leave it all night to rest.

Tray Project

Well I found this project at a thrift store, and it is this tray.  Now I am not into the country look, however I did like the idea of a tray.  Recently our tv network started airing the Nate Berkus show, and I really enjoy his show, in fact an upcoming project I am working on is inspired by his show, as well as this one.  He talks about using trays alot, and since I don't have a coffee table but a large foot rest for my couch; I thought this would be perfect to be able to set my coffee on in the mornings instead of adding an entire piece of furniture in my tiny little living room.


Here I had already started spraying it... now I now that someone really spent alot of time and talent painting those flowers, but it just didn't fit for me.  I used some spray paint I already had in the garage which is a flat black paint.  This was an enamel spray paint for something else which is a bit overkill, but I didn't want to go to the store again any flat black paint will do. 


Once it is all sprayed and dried, I began with the distressing it with some sandpaper.  I am not really sure why but this was a total impromptu project, and it felt like the right direction to go in.  This was fairly easy, I didn't use hard pressure when sanding the paint and I used a medium/fine grade.  It was fairly easy to do actually, I did do it on the back porch just in case of powder flying. 


This is after all of the distressing is finished and the paint is completely dry.  I am thinking of adding a swirl to it in the center, but that requires a trip to the store for a thick marker in another color besides black.  The total cost of the project was less than $2.  Now if I had to by the paint, it would be more like $3 total.  Not bad!

Wednesday, December 22, 2010

Tiniest Magnet Terrarium!

 One day while surfing the net, I found this cute little magnet planter, it was made from a pill bottle.  How fun is that, it is a little planter that has a magnet on it!   So with my recent new love for terrariums, I decided to modify this project.  It is a really fun project to do and very easy.  I already had the items so it took me about 5 minutes to put it together.


Here is the list of items needed: 
one small candy jar
tiny rocks
charcoal 
a tablespoon of soil
tiny plant cutting or sprout
skewer
sheet magnet (like for business cards)


The first step is to clean the bottle.  You can soak it in warm water, or use alcohol...  I did both, because I am impatient and it makes me feel like it is going faster.   I used the alcohol to rub off the adhesive that didn't quite come off after the soak.


 Once it is all clean you can drop in the rocks for drainage, and a layer of charcoal this is very important.  It is important to not overfill the bottle.  You must leave room for your plant, I like the plant to be not crammed at the top of the bottle.  This will not only leave some room to grow, it will also be more aesthetically balanced.

 The next step is to drop in some soil, I just pinched it in using my fingers.  gently smooshing out any clumps, or larger materials like small sticks, and any other f.o.d  that may need breaking down before going into the little jar.  Once the bottle is about 1/3 to 1/2 full depending on the size of your plant/sprout.  I used these instructions.

I choose a cutting from an asparagus fern plant that I already had.  It  reminds me of a tiny christmas tree.  Then I used the skewer to very gently push the cutting into the dirt and then cover it with the soil in the bottle.  Also use the skewer to push down any dirt that may be on the sides of the inside of the bottle.
 
I had leftover business card magnets, the kind where you peel off the backing and place your own business cards on, which by the way is also perfect for kid pictures.  I measured the part of the bottle that touches the fridge.  I used the whole area, since you can't see it, and I wanted to ensure there was plenty of magnet on the bottle, so it will stay really good.


I cut the shape I just measured out of the magnet sheet and peeled the paper off, stuck it to the bottle, and held it in place really tight for a good five minutes.  


Tar Tar (to quote Katie)!  Here is the finished product.  It hasn't required to much care... and I would only water it with a literal drop of water!

Monday, December 20, 2010

What an amazing idea I found!

http://inmyownstyle.com/images/2010/06/Organizer-Shelf-Before.jpg

This is absolutely amazing... its not my idea but I had to share this one.  I would have not seen this one coming at all.  She found a dresser in a field with no drawers and converted it into one amazing organizational area.

Maybe a couple of hours of work and $20 in baskets, paint, and such!  Some people amaze me with their vision.
After


This idea can be found at this link

Sunday, December 19, 2010

Bottles

My latest obsession is terrariums.  It started with these two bottles, and exploded into craziness.  The first two bottles ia an old wine decanter and a gallo wine bottle, I bought them for a whole quarter each!  The plants are from Lowes and were $1.50 each, but filled many many terrariums.


This bottle neck poinsettia jar was $3 but the cheese plate and cover was only $2 and those two cuties were .25 cents each.  But stuffed with flowers and beautiful poinsettia's they are fabulous!


The apothecary jar is a project from one Dollar Store Crafts blog  (one of my favorites)  and though it was listed as a $10 and beyond project it was really only $6 because I picked the handle at the thrift store for .25 so all in all these are really inexpensive choices for these cute little bottles.


These were really fun and easy projects, just search terrariums for instructions.  Except rather than spending $20 dollars and up for jars, take alook and your local thrift store or even dollar store for ideas.  That fit the budget!

A giveaway....

There is a pillow pet giveaway at the following link... http://megankayden.blogspot.com/2010/12/my-pillow-pets-review-and-giveaway-48.html

I mean really who doesn't love pillow pets  I ask you...  especially chocolate moose!

Thursday, December 2, 2010

Unusual source for new wrapping paper

I popped into the local thrift store to take a peak at their vessels (I am making my first bonsai tree).  So while there I noticed they had a huge christmas section.  So while perusing I saw they had brand new rolls of wrapping paper for a dollar!  When I say new, I mean still in its manufacturer's cellophane wrap and price stickers.  What a shocker, I figured on seeing most of the other christmas deco, but paper!  As it turns out most thrift stores that are non-profit types get donations from department stores, and sells them at thrift store prices.

Now these are pretty darn good, some were small but others were pretty huge like 60 sqft.  most marked 7.99 and up!  They did have some that were also partially used but still not bad if you are looking for a deal.


My store was Rescued Treasures, which has pretty good prices and great looking stuff, perfect for budget-minded, artist looking for sculpture materials, or people who like to wonder treasure hunt.  And they are a store for a cause, The Rescue Mission.

So don't forget to check those unlikely places for wrapping paper!

Wednesday, November 24, 2010

Some Thrift store finds...

Now that christmas items are showing up at the thrift stores I am stocking up.  These were not repurposed so much as there were incredibly good deals that I had to get they required almost no repair, just some minor adjustments and/or cleanups

This one was part of a lot of new items they had received from a department store.  It was a display that was originally marked at $39.99, can you believe that a 4 foot cute little fabric snowman...  Well I paid only $5 for this little man.


This my daughter loves so much, it is one of those hallmark displays you can get by buying 5 cards and spending $20 or so dollars on.  Well in the store it was also marked $5 but when you pushed the on button it didn't come on.  I still took a chance because it was very cute even if I had to get my thread puller out to remove the button.  When I got home and put fresh batteries in, it worked perfectly singing... "outside it perfect weather for a sleigh ride together with you"


This tree is a little cutey I picked up for a couple of dollars all it needed was a tree skirt.  It is pre-lit and has little random birds and flowers on it.  for now it sits in my bathroom. with the snowman/penguin trio!
It was a good day for deals.  And is proves my theory that Christmas decorating doesn't have to be expensive and the more we share and re-use the better off our resources are.

I was looking for something to flex my creative muscle with by repurposing something but it was still fun... I guess I will have to go out again. oh darn!

Friday, November 19, 2010

Repurposed find

While out shopping with my hubby, we found this mirrored bathroom shelf, at Lowe's on clearance for $10 it was missing some hardware.  We took it home, and it sat in the garage for a while.  One day while cleaning the garage we thought about it, and tried to hang in the bathroom.  However it just didn't work.  Too big, too bulky, didn't fit up to the studs just right, off center... blah blah, yada yada and all that sorta annoying stuff!


This is the beautiful corners of it, 
I love the colors of this thing too!


Sometime along the way in my life I started to collect salt n pepper shakers.  I am not sure how this happened but somehow it did, I woke up one morning and had more shakers than a restaurant!  My smart hubby suggested the bathroom shelf for it.  The spot in the hall fits it perfectly, and the only thing we had to do was hang it, and un-install the magnets for the mirrored doors.

Super simple re-purposed shelf

Wednesday, November 10, 2010

My Daddy's Fishing Lures... which haven't been used in 30 years!

A recent post gave me the idea about another frame idea... this one required no frame upgrade.  The frames were 50% at the thrift store, so I checked them out.  and found 2 I really like.

This frame had two mini african masks in them, the inside was really easy to get to on both projects, just unscrewed the back and gently pulled the masks off then glued my lures in place.


Same process with this one but I did have to paint the background black, because I wanted it to really contrast this old lure.   These look really great on the wall, and everytime I see them I am reminded of fishing with daddy.

This is an old tray I found at a yard sale I only paid a dollar for it.  I just screwed in a hangar on the back.  The little fuzzy thing is a lure a picked up at a sale.  I am planning on eventually putting the rest of my collector lures in this, but I couldn't wait to display it.

I love fishing and I do have tons of lures I use all the time, but sometimes I find something that I just have to have but don't want to use anymore.  Lures are a beautiful thing, and lure making will be my retiring hobby.

Monday, November 1, 2010

before and after picture woes....

I look around at all the things I have found and repurposed but never took before pictures.  But that is okay, lesson learned time to move on.... 

This being one of them.  The sculpture is something I did a while ago, and it looked terrible just dangling on the wall.  Shockingly canvases that small are very expensive.  While out running errands I found this canvas, it was actually bright lime green with an blue elephant on it, for only $1!   So I grabbed that guy and took him home to my studio and slapped some black paint on it, and mounted my sculpture.


Now imagine a grandma's broach, or grandpa's old wire rimmed glasses, or fishing lure mounted there.  Or some really cool keepsake you have found while treasure hunting.   Canvas doesn't have to be a place for a painted scene or mounted sculpture it can be whatever you want!

Tuesday, October 19, 2010

Homemade Costumes that are super creative

Okay so this is a list of websites that have the cutest ideas for really cool homemade costumes.  I am really into the illusion costumes this year.  There are links all through this post of where I found the costumes, so be sure to check them out.  These costumes are a different take on what I remember as 'homemade costumes' and they are fabulous ideas. When I was little homemade costumes consisted of fake giant boobs made from random material and wildly hairsprayed and glittered hair which I am convinced is responsible for the styles of the 80's...

http://www.coolest-homemade-costumes.com
Now, this first one is pretty cool it is a stroller costume, of a cabbage patch kid,which pretty much consists of a box painted and some online printed logos modge podged to the box.  It is cheap, cute, fast to make, and fun with no actual costume for the baby to wear and can be found at this link.
This fire truck is also easy and very cute, and looks like it sits just nicely on a stroller.  This is one last stroller costume I found at the same website as the cabbage patch kid (which really deserves some quality time searching through) is R2D2  a little more time consuming to make but very cool follow this link for pictures.

Another favorite category is the illusion costumes.  Some of these are very elaborate but some are not and still very cool.  The first one is one that looks fairly easy to make, and very well might end up being my costume this year, there is a lot at this link.  I am not a fan of the bloody ones, but that's just me.  This next website has a lot of them with instructions but my favorite is near the bottom called 'witch with frog in cauldron'.   Here is another creative one that is extra, super cool; the link for this video also has the instructions and the there another video of the same costume as well that shows more of it here.  These girls made a version that seems to be easier to walk around in, as long as you secure the foot better, this is also a video link.   When searching for illusion costumes I find it best to select the images option and also the video option, to get a better idea of what you are looking at.  

This website has a few great ideas, check out the lego costume at this link.  If you change the red sweat suit to blue you'll have Mike from Monsters Inc at this link.  Familycrafts.about.com has alot of cute ideas including more stuff to do with cardboard boxes.  There is a really cute aquarium at Costume Idea Zone which also has a skill crane costume as well.  Family Fun is pretty great site I like their "last minute costumes" with their clever renditions of a quarter back and smartie pants,  but don't forget to check out all of their categories I especially love their jellyfish costume.

Budget101.com has tons of ideas for costumes, parties, decorations, makeup/special effects and more.  I would plan on spending some time here.  And last but not least, dog costumes; there's no reason why fido can't join the fun.  Check out family.go.com or animal.discovery.com for some cute ideas.

So go out, exercise your creative muscle and make a costume.

You can also comment at: http://thirtyzone.blogspot.com/

Sunday, October 10, 2010

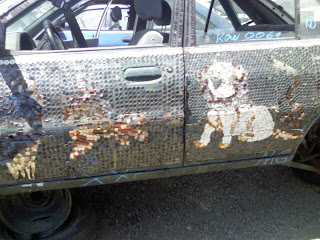
a car part junkin' trip...

This cracked me up... this car though was in the junk yard, was at one time on the road this decorative.  Most of the car is covered in these random buttons, and small decorative found objects.  It makes me wonder how long it took to do this, what creative genius decided out of the blue to opt for designs vs. a new paint job.  And how sad the day was when this little guy was retired to the junk yard...